Framing a builder grade mirror that is not between two walls
I promised quite a while ago that I would give directions on how to frame a builder grade mirror that is not tight between 2 walls (like my first post here).
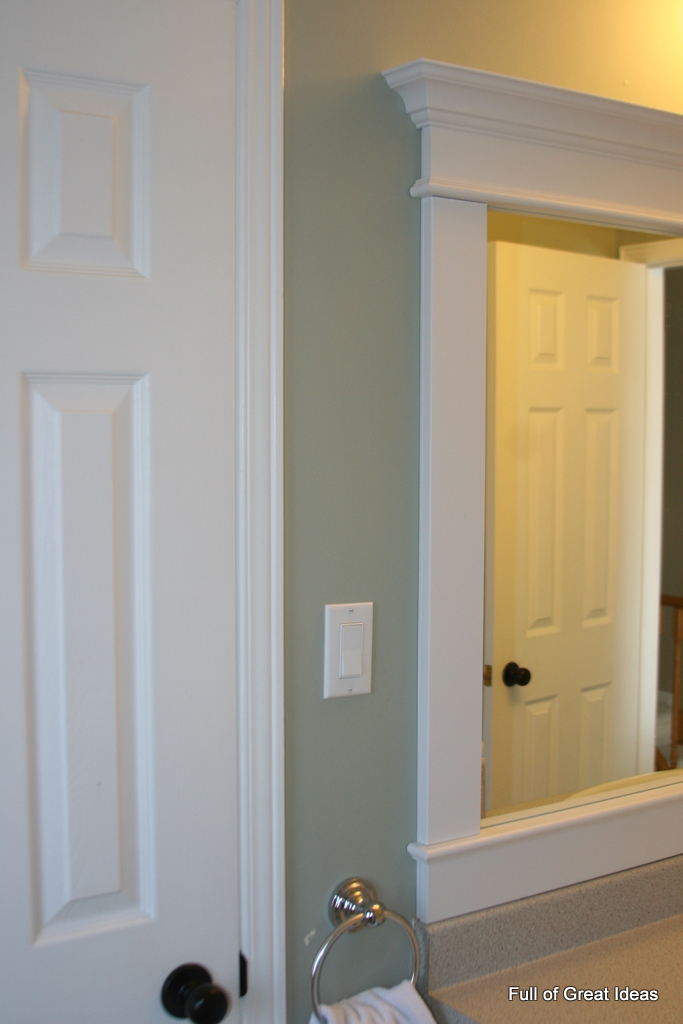
My daughter's bathroom has a mirror on a long wall and we needed to find a way to conceal the mirror when looking at it from the side (since the frame sits on top of the mirror).
 In my master ensuite bathroom our mirror is fitted tight between two walls, so we adhered the frame directly onto the mirror.

We used the generally the same materials and mostly the same method to create this frame. For detailed instructions on how we made this mirror frame, please refer to this original post.
I am only going to show you how this frame differs from the original post.
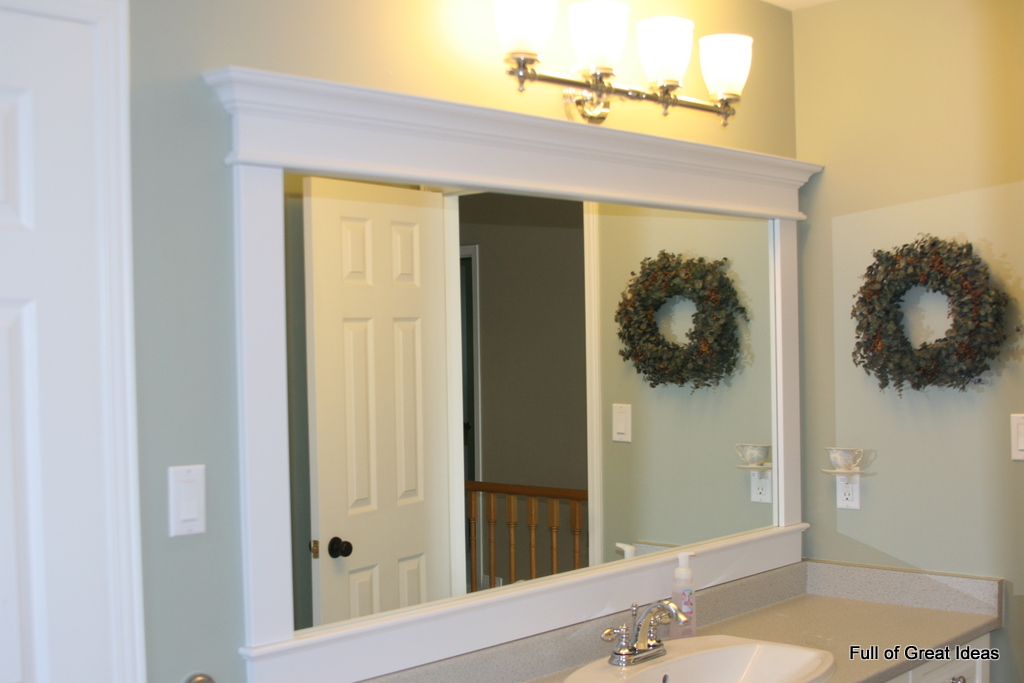
This frame was much more difficult for my husband to create. We could not just create a frame with straight cuts and not have to worry about how the molding was finished on the sides. Since the frame is adhered to the mirror, we had to determine a way to hide the mirror when looking at it from the side and we also had to finish the crown molding and flat trims (making it into a 90 degree corner) so that it was finish nicely.
 We used a smaller crown molding for the top because the bathroom light was tighter to the top of the mirror and we did not think we had room for a large, detailed piece of molding.
 In order to hide the side of the mirror, we measured the depth of the mirror and purchased a thin piece of molding that was the exact depth of the mirror. We painted it to match the frame, cut 2 pieces to be the exact height of the mirror and secured them onto the wall on both sides of the mirror.
 Using the same techinique as we did in the first post, we created the rest of the frame.


Once the frame was secured, we used some filler (like DAP or caulking) to fill in the seams between all the pieces used to create the frame. This gave the frame a nice finished look. It made the frame look like 1 piece and not a bunch of little pieces stuck together.

 The hardest part by far was getting the angles for the crown molding and flat trim. If you search online you can get the exact cutting angles needed to achieve a perfect corner. Remember though, the caulking can hide errors :) ...this we know first hand.
Please let me know if you have any questions. Enjoy!
Stephanie
My daughter's bathroom has a mirror on a long wall and we needed to find a way to conceal the mirror when looking at it from the side (since the frame sits on top of the mirror).


We used the generally the same materials and mostly the same method to create this frame. For detailed instructions on how we made this mirror frame, please refer to this original post.
I am only going to show you how this frame differs from the original post.
This frame was much more difficult for my husband to create. We could not just create a frame with straight cuts and not have to worry about how the molding was finished on the sides. Since the frame is adhered to the mirror, we had to determine a way to hide the mirror when looking at it from the side and we also had to finish the crown molding and flat trims (making it into a 90 degree corner) so that it was finish nicely.


Once the frame was secured, we used some filler (like DAP or caulking) to fill in the seams between all the pieces used to create the frame. This gave the frame a nice finished look. It made the frame look like 1 piece and not a bunch of little pieces stuck together.
Please let me know if you have any questions. Enjoy!
Stephanie


Thanks for this! My husband and I are so anxious to do this in our master bathroom!
ReplyDeleteI'm trying so hard to get my husband to do this, lol!!!!
ReplyDeleteHi, I just stumbled across your blog and am so happy I did. I'm thrilled to be your newest follower! I hope you'll come visit me sometime....
ReplyDeleteStacy @ www.conspicuousstyle.com
Hi there! I can't find help ANYWHERE that can tell me how to do this on a corner mirror (mirror on two adjoining perpendicular walls). Can you offer any guidance?
ReplyDeleteLooking for the same thing. Will keep an eye out for answers.
DeleteHi Stephanie,
ReplyDeleteMy master mirror is huge and has a 4 plasice brackets secured with a screw (I imagine to help support the mirror) around the mirror. How would I glue the wood over these without having a gap in the frame?
ahtrev@yahoo.com
Stephanie,
ReplyDeleteThank you so much for posting both of these tutorials. I have wanted to do this, for the exact same reasons you said, for a REALLY long time. I love the paint color you have in your daughters bathroom. Do you remember the brans and/or color?
Thanks,
Sarah Lenz
sktegge@cox.net
Love the paint color in your smaller bath. Would you mind sharing?
ReplyDeleteThanks,
Robin
rojohnson35@aol.com
Amazing! This is just fantastic!
ReplyDeleteclick here
Love it! I went to HomeDepot and bought all the word except I couldn't find the "trim" piece. Where did you buy yours from? I'm having a difficult time seeing exactly what the trim piece looks like. Do you have another pic of the trim? Thanks.
ReplyDeleteSuper stunning.online beds for sale UK
ReplyDeleteThe TV is an essential and central part of many homes but if you don’t want to have the TV permanently on display you can now discreetly hide it behind a beautifully custom picture framed Mirror TV.
ReplyDeleteNice blog you share nice information.Discount Beds and Mattresses
ReplyDeletethats such a looking awesome,?1.Kids Car Beds
ReplyDeleteMaster Framing are the experts in framing in Sydney.
ReplyDeleteWe specialize in memorabilia framing, custom picture framing, canvas stretching and photo mounting.
We have grown into one of the most competitive picture framers in New South Wales,
offering a large range of picture frames and picture framing services.
custom mirror framing
This is great article and so helpful. I like this. Please Visit:
ReplyDeleteCustom Picture Framing Sydney
Nice idea. I'm going to try it! Only part you left out was the cutting and attaching of the side pieces of the crown moulding and the 1/2 round. Important to have a good miter saw for that part.
ReplyDelete
ReplyDeleteREALLY GREAT POST ADMIN THANKS FOR THIS WORTHY
opera for pc
opera mini apk download
opera pc download
http://www.operaminiforpcfreedownload.com/
opera vpn for pc
instagram pc windows
instagram best captions
mobdro apk update
zapya apk for pc
Shareit apk
hii
ReplyDeletehttps://khalejmovers.com/نقل-اثاث-الرياض-الكويت/
ReplyDeletehttps://khalejmovers.com/نقل-اثاث-الرياض-الامارات/
https://khalejmovers.com/نقل-اثاث-الرياض-الاردن/
https://khalejmovers.com/نقل-عفش-بالرياض-رخيص-300-ريال/
You have to keep on being enthusiastic and don't give up, keep it busy, hopefully it will pay off
ReplyDeleteCara Menyembuhkan Buah Zakar Bengkak
Cara Menyembuhkan Asam Urat
Obat Mata Merah
Cara Menyembuhkan Radang Usus
Obat Cacingan Alami
You made some decent points there. I looked on the internet for the issue and found most individuals will go along with with your website.
ReplyDeleteVisit Site
Site123.com
Wow, incredible blog layout! How long have you been blogging for? you made blogging look easy. The overall look of your web site is fantastic, let alone the content! hair salon
ReplyDeletejordan 1 off white
ReplyDeletemoncler
bape hoodie
curry shoes
kyrie 5 spongebob
moncler coat
yeezy shoes
curry shoes
paul george shoes
golden goose
Thank you very much for the information. https://www.hairsalonues.com/
ReplyDeleteLearned a lot from your article post and enjoyed your stories.
ReplyDeleteVery interesting website it is. I saw many different posts here and all are very interesting and informative.
ReplyDeleteI’m impressed with your data. Well detailed! Thanks |
ReplyDeleteclick here
Excellent Blog with so much useful information, thank you so much for your work. | www.hairextensionssanfrancisco.com
ReplyDeletexybd94v1w814
ReplyDeletegolden goose outlet
golden goose outlet
golden goose outlet
golden goose outlet
golden goose outlet
golden goose outlet
golden goose outlet
golden goose outlet
golden goose outlet
golden goose outlet