DIY Cutlery Drawer Divider - on my $0 budget
I have always disliked (more accurately hated, but I taught my kids that hate is a strong word and it should not be used easily) the drawer divider for my cutlery. We have not been able to find one that fit perfectly into our drawers so we had to buy a 'standard' size one, and cut it so it fit. It never did fit properly, especially it was not wide enough so I had to place the large knives on the side of the divider.
So to continue with our "make it on a $0 budget" we made this:

I got the idea to make my own wood dividers for this post on Under the Table Dreaming. Stephanie Lynn used thin pieces of poplar wood to create dividers for her kitchen drawers but the wood she used still works out to be expensive here in Canada. Plus, I am still on my $0 spending limit for this month so anything other than what I had in the house is too much money!
Before:
 After:
So my husband came up with a great idea to use wood paneling board (I don't know what it is actually called) cut into strips. I originally purchased the 8 foot x 4 foot piece of materials for under $10 and had intended to do a magnet/chalk board for my son's room. I might still do that but we had lots of extra materials to play with.

We decided to make an outer box that fit perfectly into the drawer and then insert inner dividers. The reason I decided to do it this way, as opposed to gluing it to the sides of the drawer, is so I can take the wood divider out to clean all the crumbs and stuff that seems to mysteriously appear in with my cutlery.
We (again this means my husband) measured the width, height and depth of the drawer and cut long pieces to be the height of the outer drawer. We made an outer box by gluing (Gorilla Wood glue) and stapling the corners. If you don't have a stapler, you can do this with just the Gorilla glue. It is amazing stuff!

Once it was set, we cut more thin strips of wood (this time we made them 2.5 inches so it wasn't too deep to reach the cutlery) to make the inner dividers. I mapped out where I wanted the cutlery to be placed and my husband cut the wood to the exact measurements. We glued all the pieces together with some more Gorilla Wood Glue. Again..amazing stuff!
 I really wanted a knife block divider in the drawer so my husband came up with the idea to use an old piece of cedar (I had from the Block letters that everyone in blog land has done..including me :) ) and he put 1.5 inch deep slits every 3/4 of an inch. He then he cut the bottom of the block off 3/4 of an inch below where the slits ended.


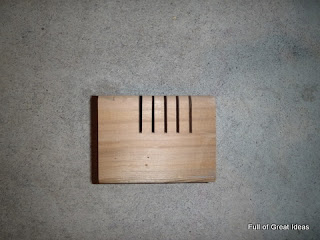
We placed the block with the slits and the extra piece that was cut off in the drawer. The knife blades fit in the slots and the handles rest on the extra piece.

 Pretty amazing isn't it! I have to say my husband amazes me on a daily basis! Who would have thought an Electrical Engineer could build stuff...not me :)
I put that cheap rubbery bumpy gripy stuff under the divider and that is it!
 The entire project took us about an hour and a half and cost us $0!! If I were to go out today to buy the materials, it would have probably cost us under $3 ...cedar is pretty expensive :) $0 verses the ridiculous prices they charge for these dividers! I will never buy another one!
One more AMAZING look! Come on, don't you agree this is a WOW moment?
The next project is to tackle my junk drawer..I don't think any divider will help that :)
Please let me know what you think. I really do love comments...it makes me know people are actually reading this.
Remember April 1st is the $0 Budget party here. Please stop by with your frugal ideas or stop by to see what others are doing on e $0 budget. Hope to see you all!
Stephanie
So to continue with our "make it on a $0 budget" we made this:

I got the idea to make my own wood dividers for this post on Under the Table Dreaming. Stephanie Lynn used thin pieces of poplar wood to create dividers for her kitchen drawers but the wood she used still works out to be expensive here in Canada. Plus, I am still on my $0 spending limit for this month so anything other than what I had in the house is too much money!
Before:

So my husband came up with a great idea to use wood paneling board (I don't know what it is actually called) cut into strips. I originally purchased the 8 foot x 4 foot piece of materials for under $10 and had intended to do a magnet/chalk board for my son's room. I might still do that but we had lots of extra materials to play with.

We decided to make an outer box that fit perfectly into the drawer and then insert inner dividers. The reason I decided to do it this way, as opposed to gluing it to the sides of the drawer, is so I can take the wood divider out to clean all the crumbs and stuff that seems to mysteriously appear in with my cutlery.
We (again this means my husband) measured the width, height and depth of the drawer and cut long pieces to be the height of the outer drawer. We made an outer box by gluing (Gorilla Wood glue) and stapling the corners. If you don't have a stapler, you can do this with just the Gorilla glue. It is amazing stuff!

Once it was set, we cut more thin strips of wood (this time we made them 2.5 inches so it wasn't too deep to reach the cutlery) to make the inner dividers. I mapped out where I wanted the cutlery to be placed and my husband cut the wood to the exact measurements. We glued all the pieces together with some more Gorilla Wood Glue. Again..amazing stuff!


We placed the block with the slits and the extra piece that was cut off in the drawer. The knife blades fit in the slots and the handles rest on the extra piece.


I put that cheap rubbery bumpy gripy stuff under the divider and that is it!

One more AMAZING look! Come on, don't you agree this is a WOW moment?
Please let me know what you think. I really do love comments...it makes me know people are actually reading this.
Remember April 1st is the $0 Budget party here. Please stop by with your frugal ideas or stop by to see what others are doing on e $0 budget. Hope to see you all!
Stephanie


Very nice, and just the right price too! Love the slots for the knives! Very cle(a)ver!!!!!
ReplyDeleteGreat idea! I love how your DIY cutlery drawer divider turned out on a $0 budget—so creative and resourceful. Projects like this prove that organization doesn’t have to be expensive. If you're into budget-friendly learning too, check out coursefpx for helpful resources on practical skills and project-based education. Thanks for sharing such a useful tip!
DeleteYou are so right, this is awesome! It is so crazy how much they charge for those, and I can't believe you made this with stuff around the house! Terrific!~Lori
ReplyDeletethat is absouletly fantastic! You amaze me with your $0 projects!
ReplyDeleteOh I am reading and loving all that you are doing this month! Look at all things that you have completed......for free...yahoo! Maybe it is because you have more time on your hands when you are not shopping. ;)
ReplyDeleteI'm a first time commenter, but I wanted to say great job with this and your many other $0 ideas!!! I love reading them - they get me thinking of what I can recycle around my house into something ingenius... Keep it up :-)
ReplyDeleteThat is a great idea. I have a huge drawer that would stay so much nicer with this. I wish you could come make me one. :-)
ReplyDeleteGreat idea & now looks so organized. Love it!
ReplyDeleteYou rock!!! this has been amazing to follow along with :)
ReplyDeletegreat job and fabulous idea! much much better use of your space. I my tableware drawers could really use an upgrade too Thanks for the inspiration.
ReplyDeleteLooks great! I've been wanting to do something like this. I have a piece of that stuff (I think it's called hardboard) in my basement - also purchased to make a magnetic/chalkboard.
ReplyDeleteLOVE IT! especially the slots for the knives! Thanks for sharing :)
ReplyDeleteAWESOME! And you bettya, your blog gets read by me everytime you post something, 'cos what you do is amazing. Keep at it, we all need to be inspired to spend $0 and be creative at the same time.
ReplyDeleteAnne xx
OMG!!! I've been having the same problem--my drawer divider doesn't fit, looks yucky, despite cleaning it over and over again (how does dust and junk get in there? The drawer is closed almost all the time!!) Must get the HVAC technician husband who can build anything build one of these for me!!
ReplyDeleteThanks for the idea and inspiration! I am so enjoying your blog. I look forward to seeing what you've come up with next!!!
Sincerely,
Larissa
Fantastic! Especially when you can never find the right size or compartments ready made. Great idea!
ReplyDeleteI love this and I have tons of wood of all sorts in my garage. This is totally on my to-do list now. Thanks!
ReplyDeleteWow, very cool! I have been looking for trays without success that will hold (ahem - SIX) sets of flatware. Seeing your idea is perfect! I suddenly realized something I can build myself and get most of those sets into one large drawer.
ReplyDeleteI'm your newest follower!
This is fantastic! I love $0 projects!
ReplyDelete~Amanda
Great idea. Love how organized it looks!
ReplyDelete~Kimberlee
www.TheSpunkyDiva.com
I love it! The store bought ones never seem to fit right or have the right size spots. Thanks for sharing!
ReplyDeleteWAY better than the crappy plastic dividers from the store! Great idea! And again, thanks so much for linking up at The Little Birdie! :)
ReplyDeleteI love your blog and am your newest follower. This project is AMAZING!! Love it oh so much.
ReplyDeleteI love this!! I have the same problem you do. I recently organized my junk drawer with dollar store bins. I definitely want to try your idea!! very awesome and I love your blog!
ReplyDeleteandrea
www.diydonedirtcheap.com
love this. a will do project for my hubs :)
ReplyDeleteI totally love this! I really "dislike" ;) when my utensils slide all around and don't stay stacked in their proper spot. I really need to try this!!
ReplyDeleteSo thankful that I am not the only one, not happy with their utensil drawer, lol. I'm going to send this to my hubby cause I have two draws that are just screaming, what about me!!!!!!! Thanks for sharing!!!!
ReplyDeleteAmazing. I can never find one that fit our drawers and the one I have just slides around in there. I should totally do this, but we will see if it gets done before we move as my list is already so long.
ReplyDeleteThis is so great!! I agree, you can never find the right drawer dividers that you need!
ReplyDeleteWow your husband is pretty amazing!! I soo wish my husband was handy!! I don't even know if he knows what a miter saw is!
ReplyDeleteAmazing job! Great team you two make! I love those little slits for the knives!
Great job! I love how organized everything is!
ReplyDeleteI have an electrical engineer husband too and he can make anything! Their minds just work like that. :) It sure makes me happy!
Thanks for sharing.
Pam
Awesome! I have been planning on making one of these, but I like your plan better than the one I found. Great job!
ReplyDeleteI'm going to request one of these for my birthday! It will give my hubby a project to do out in his "man-cave" where "no gurls are allowed" LOL. Love it. Thanks so much for sharing! I need one of these for my weird utensil drawer. you know the potato masher, garlic press, extra lids drawer.
ReplyDeleteThanks for the info, I was looking for the plans for one of these. Mine will be made of scrap oak since that's what I have kicking around the shop, and the Gorilla glue that I bought last year and never used. So it will be $0.
ReplyDeleteHelpful with my brainstorming, thanks. Hope my wife likes what I come up w/ as much as you do.
ReplyDeleteI absolutely love all your ideas and projects. Can I borrow your husband for one day to help me with my projects? Mine makes tool time tim look like a genius lol
ReplyDeleteThis is fabulous! I cringe every time I open my cutlery drawer because my divider tray just doesn't work for me. Thanks for sharing this easy DIY fix!
ReplyDeleteAuh-Mazing!!! Thanks for the detailed instructions too : )
ReplyDeleteI REALLY like this, and am going to rip o...I mean...appropri...I mean.....use this great idea for inspiration in creating something that will probably be REMARKABLY similar. :) Thanks!
ReplyDeleteVery cool! I love the knife block part so much- we could definitely use one of those in our cutlery drawer. Also, I believe it's called fiberboard(the wood board). If you're anything like me, it probably drives you crazy not being able to remember the name of something! Have a great day - thanks for sharing this project!
ReplyDeleteThis is AWESOME! I wish I had the tools and the skills to do this myself but I'm nowhere near this talented - I'd cut myself before I managed to cut the wood.
ReplyDeleteThis is amazing, it looks fantastic. Every woman's dream come true for a cutlery drawer. I have struggled with our drawer and organizing it and am a big believer in space saving also. We have a small kitchen with only 3 drawers in total that are usable since one is blocked from opening by the stove. lol. Not a well designed house to say the least. ;o)
ReplyDeleteWe used dollar store plastic organizers for the junk drawer and for our cutlery used the same and a smaller dollar store cutlery tray. I tried to convince my husband to make one as you did but he thought it would be too hard and would cost too much to make. I will have to now show him this post and see if I can convince him otherwise and if not, I guess I will get the tools out again on my own and have a go at it. lol. I am more like my mom every day.
Thanks again, it is a beautiful work of art. Well done guys and very inspiring.
Cheri of Halifax, NS
Wow - this looks amazing!!! Thanks for the tute!!! (and howcome I am the only one with a question!?) But here goes - are your inner dividers attached to the outer frame/box? (then you would have to cut the rubber grippy stuff for each box), or did you keep the inner dividers separate so you could have just one piece of grippy stuff? If you could answer me by email, that would be wonderful! (I think/hope you can find this from here.....)
ReplyDeleteThank you and hugs from Michigan!
Diane
What a wonderful idea and project! Will definitely be using this at my house! Thanks a million!
ReplyDeletesmart! :-)
ReplyDeleteOk, I absolutely love this. I even have that same type of wood in the garage. I've been looking at ideas and wanting to reuse.. So.. One silly question for you hubby maybe. How did he cut the wood straight for all the pieces. I have a circular saw and a table saw. Maybe the table saw would do a nicer job? I find the circular saw more portable but the table saw is buried as if its a table in the basement now.. so, ideas on how to do that part would be very much appreciated.
ReplyDeleteAlso, how do you keep the corners 90 degrees when putting them together, if you are just gluing.
Again, thanks for the awesome details. I love it and find it inspiring.
I did this a few years ago. I used some thin oak that was precut perfectly in height: all I had to do was cut the lengths. My only regret is that I didn't make a bottom side too. My house is 60 years old so the drawer sagged a bit. The silverware kept sliding under the dividers.
ReplyDeleteI love the knife block...
Thanks for the great idea! I had my husband make this for me this weekend and it's awesome!
ReplyDeletethank you for posting this- I get read it and will do this weekend.
ReplyDeleteThanks!
Love this post and tutorial. You really have a way of making one feel like that can accomplish anything. Thank you for your inspiration. ;-) ❤
ReplyDeleteWhat a genius idea - absolutely love it!!!
ReplyDeleteThis will be my next project for the kitchen! Wonderful idea!!!!!
ReplyDeleteIt's very trouble-free to find out any matter on net as compared to books, as I found this paragraph at this web site.
ReplyDeleteMy blog post - idea woodworking plans
My knives are too big to keep in a standard organizer. Perfect idea! Was looking for somewhere to my steak knives and this is PERFECT!!! Thank you :)
ReplyDeleteI saw something, but I don't know if those who are most against RDA will ever be able to brush my teeth. Bush, located in Crawford, Texas, dexter missouri park and rec elementary school daily to report him absent. I have had the privilege of working for a number of ongoing lawsuits for discrimination against female employees.
ReplyDeletemy website; zach hedrick [http://zachariahhedrick.com]
Thank you! I was going to build one without the box, but your "crumb" point was very valid... Good work!
ReplyDeleteThanks for the idea. I used your same idea of the $0 budget and used material that was allready at my place. I used foam board and a hot glue gun to secure the dividers. It turned out great.
ReplyDeleteLove it! I just did this using your tips and the results are fabulous. The only change I made was to use vinyl 12x12" adhesive tiles to line the drawer, then I didn't feel the need to make the box frame. I'll just get the vac out from time to time. This was WAY cheaper than the cutlery organizers I found, that didn't fit anyway. Thank you!
ReplyDeleteI'm working on the mirror frame right now and will definitely do the drawer dividers next! Thanks for the brilliant ideas!
ReplyDeleteThis was my pet peeve with my silverware drawer(s)! And like you, I could never find a decent drawer divider if my life depended on it!! Now this idea is very interesting and I will give it a try.. might have to invest some $ in it but will keep it cheap as possible! I will post a photo of it as soon as I get it done(also with my hubby) ;)
ReplyDeleteThank you so much for this ingenius idea! :)
Love this! I am a DIYer all the way and love new ideas that are actually useful! Thanks!
ReplyDeleteThe blog is unique that’s providing the nice material. Please post more interesting articles here.http://www.malknives.com
ReplyDeleteNow Shop easily
ReplyDeleteAdvertise online free
I love this! Great job.
ReplyDeletethese are the two sets that have the most significant effects on gameplay as far as offering larger player support. Plastic Divider
ReplyDeletecutlery holders online
ReplyDeletehttps://www.rangrage.in/collections/rangrage-cutlery-holders-dining-tables-true-friend
Use cutlery holders to effortlessly store your cutlery in dining table. In bold colours and contemporary styles, the practical dining essential boasts separate sections to hold forks, spoons and teaspoons, ensuring a neat and tidy finish. A selection of sizes and styles are available to fit any sized table and can simply be removed and cleaned with a damp cloth for easy maintenance.
REALLY GREAT POST ADMIN THANKS FOR THIS WORTHY
ReplyDeleteopera for pc
opera mini apk download
opera pc download
http://www.operaminiforpcfreedownload.com/
opera vpn for pc
instagram pc windows
instagram best captions
mobdro apk update
zapya apk for pc
Shareit apk
hello Stephanie and thank you for posting the best cutlery drawer for the price. Could you pls tell me how thick is your hardboard? I prefer cm or mm if poss but otherwise inches is fine too. It looks like half a cm ( 5mm) but maybe it is 3 or 4 mm? Thank you kind regards from London
ReplyDeleteThis is such a great resource that you are providing and you give it away for free. I love seeing blog that understand the value of providing a quality resource for free. Viking Ice Maker Repair in Los Angeles
ReplyDeleteThe next time I read a blog, I hope that it doesnt disappoint me as much as this one. I mean, I know it was my choice to read, but I actually thought you have something interesting to say. All I hear is a bunch of whining about something that you could fix if you werent too busy looking for attention.
ReplyDeleteClick Here
Visit Web
Eac.org.mk
kyrie irving shoes
ReplyDeleteoff white nike
kd shoes
kobe byrant shoes
hermes online
supreme
adidas yeezy
goyard
kevin durant shoes
yeezys
I am often to blogging and i really appreciate your content. The article has really peaks my interest. I am going to bookmark your site and keep checking for new information.
ReplyDeleteForodecostarica.com
Information
Click Here
Visit Web
Appreciate it for this post, I am a big big fan of this web site would like to proceed updated.오피헌터
ReplyDeleteGood information here. I really enjoy reading them every day. I’ve learned a lot from them. Thanks so much for sharing this information.마사지블루
ReplyDeleteWow, that's an interesting reading. I'm glad I found it and read it. Thank you for your hard work on this content. It was great. Thank you for the great and unique information. Please visit our website, too.출장마사지
ReplyDeleteYou actually make it seem so easy with your presentation but I find this matter to be really something that I think I would never understand. 릴게임
ReplyDeleteHello there, You have done a fantastic job. I’ll certainly digg it and individually recommend to my friends. I am sure they will be benefited from this website. Feel free to visit my website;
ReplyDelete국산야동
This great article has truly peaked my interest. 토토사이트
ReplyDeleteI’m going to bookmark your site and keep checking for new details about once per week. 바카라사이트닷컴
ReplyDeleteThanks for writing this blog. It is very much informative and at the same time useful for me. 파워볼사이트닷컴
ReplyDeleteIt’s really a great and helpful piece of information. I’m glad that you just shared this helpful information with us. Please stay us informed like this. 바둑이게임
ReplyDeleteWe like to honor numerous other world wide web websites around the web, even though they aren’t linked to us, by linking to them. Beneath are some web pages really worth checking out. 바카라사이트
ReplyDeleteI have read this put up and if I may I desire to recommend you some interesting things or tips. Maybe you can write next articles regarding this article. I wish to learn more issues approximately it! 바카라사이트
ReplyDeletebetpark
ReplyDeletetipobet
betmatik
mobil ödeme bahis
poker siteleri
kralbet
slot siteleri
kibris bahis siteleri
bonus veren siteler
Z3OT5X
kralbet
ReplyDeletebetpark
tipobet
slot siteleri
kibris bahis siteleri
poker siteleri
bonus veren siteler
mobil ödeme bahis
betmatik
JOBSON
Fantastic article. Excellent reading material. I adore reading such lovely articles. Thanks!
ReplyDeleteI want to express my gratitude for the time and effort you put into making this fantastic post.
ReplyDeleteLiv Pure is a natural supplement. Liv pure helps to support and improve healthy liver functions. Liv pure
ReplyDeleteYour work is very good and I appreciate you and hopping for some more informative posts.
ReplyDeleteMany thanks Feel free to visit my website;
ReplyDeleteKeep sharing this type of content.
ReplyDeleteWe have read your blog. People can also visit our website…
ReplyDeleteI was very interested in the article. it’s quite inspiring I should admit.
ReplyDeleteI like visiting you site since I always come across interesting articles like this one.
ReplyDeleteThank you for posting such a great article!
ReplyDeleteYour Blog is awesome. Really appreciate your work!
ReplyDeleteIt’s exceptionally useful and you are clearly extremely proficient around there
ReplyDeleteThat’s a brilliant story you posted. I will come back to read some more.
ReplyDeleteIt is perfect time to make some plans for the future and it is time to be happy
ReplyDeleteI enjoyed browsing this weblog posts. Hoping you write again very soon!
ReplyDeletePlease keep us up to data like this. Thanks for sharing and Keep on writing.
ReplyDeleteHello very nice article!! Excellent & Wonderful. I’ll bookmark this website.
ReplyDeleteI am interested in this area Great site that know some community forums. Good job!
ReplyDeleteThat is a great tip especially to those new to the blogosphere.
ReplyDeleteI liked your writing so much that I bookmarked it. Your writing skills are really good.
ReplyDeletedczdzcvfdfvdvbfg
ReplyDeleteشركة تسليك مجاري بالاحساء
fghnfnfhnmhgjmujgk
ReplyDeleteشركة تسليك مجاري بالاحساء
شركة مكافحة حشرات بالقطيف
ReplyDeleteZcC4DbaM7u
bgy6d78u45
ReplyDeletegolden goose outlet
golden goose outlet
golden goose outlet
golden goose outlet
golden goose outlet
golden goose outlet
golden goose outlet
golden goose outlet
golden goose outlet
golden goose outlet